Saturday, January 28, 2012

Pretty Princess Hair Styling Tutorial

This is the first installment of many hair styling tutorials to come.

I had such a cute little model to work with this week who was so excited to get her hair done... can't tell by her face... ha, ha, ha!


She had no input on a specific hairstyle she wanted to try so I decided that with her gorgeous, long, incredibly straight hair that I would give her what I call the "Pretty Princess" style. I drew my inspiration from the movie "The Princess Bride". (see picture below)


I will use my lovely hair mannequin, Gwen, to demonstrate how we achieved this adorable look.

Supplies: Medium to large barrel curling iron, hairspray, tail comb, brush, bobby pins, 4 clips to section hair off and a head of hair to style.

Step 1:  Hair must be dry and detangled. It is best to work with hair that is not freshly washed because clean hair tends to be slippery and not as easily manipulated. It is always good to have a little product in the hair as well.

Step 2: Using the tip of your tail comb part bangs down the middle and clip them up and out of the way. If your model does not have bangs then section off the area just in front of the ears (at the front of the crown) and above the ears as shown in the picture below.


Step 3: Create and clip out of the way the hair at the crown of the head and another section just below the crown and about 2 inches above the nape of the neck.


You should now have the front of the hair (bangs) parted in the middle and clipped out of the way and 2 sections of hair clipped up with the last section hanging down and ready to curl.


Step 4: Starting with the bottom section of hair pull out about a 2 inch section of hair to curl. Start with your barrel at the top of the hair near the scalp to create body. Hold this position for a couple of seconds and then with the hair still in the barrel pull the iron down and roll it back up. We are going to curl the hair in the direction away from the face. Working from the bottom section up, curl all of your model's hair. Wait a few minutes for the hair to cool completely and then spritz with light hairspray for hold.


For a wavy look leave about 1.5 inches of hair out of the barrel.


Step 5: Before letting your bang/front sections down clip the hair behind it back and out of the way. Begin your braid at the top of the part. French braid the section until you run out of hair to pull from then, continue braiding normally until you have about 4 inches of hair left. Pin this hair up and out of the way and do the other side.


Step 6: Bring both braids to the back of the head and cross them over one another. Using two bobby pins pin the hair in place. I use a crossing pattern because it is a more secure hold and.... it's kinda cute. 


Step 7: Lightly tousle the hair to loosen the curls and spritz with a light hold hairspray. Now you have the "Pretty Princess" look!


What a doll! She looks happy now! She was twirling around after our session exclaiming, "I just LOVE my hair!"

I hope you have enjoyed this tutorial! If you have any questions, please do not hesitate to ask. As a side note, I'm thinking the next tutorials will be in video form....

Friday, January 27, 2012

Follow us on Bloglovin :)

please feel free to follow Santa Barbara Historical Museum celebrations on...

we look forward to more celebrations to come...

photo: enLuce Photography

Style Me Pretty feature... Olivia & Mike


"The Santa Barbara Historical Museum is already so beautiful, so we kept the decorations simple with string lighting harvest tables and all-white flowers with green succulent accents.  My overall vision was rustic chic, which I think went perfectly with the setting that I had. I loved walking into the courtyard and seeing all of my hard work and planning come to life. However, the most memorable part of the day was when we made our entrance to the reception and danced our first dance song to M.Ward’s “Let My Love Open the Door.”  It was such a surreal moment and, at one point, it felt like it was just Mike and I in the whole place." -the lovely bride

"Please take your potted plant to your Santa Barbara Street for dinner."
-guests tables were named after streets in Santa Barbara such as Cabrillo, Mission, etc...what a cute idea!

Churros....yum!!!


Congratulations Olivia & Mike!


Wedding Photography: Amanda Rae Photography/ Videographer: Daniel Chae
Ceremony: Our Lady of Sorrows Church /Reception: Santa Barbara Historical Museum
Lighting: Bella Vista Designs/ Rentals: Ventura Rentals Party Center
Catering: Omni Fresco Catering /Flowers: Juniper Floral Designs /Music: DJ Nick Andrews
Wedding Invitations: FrannyBee Designs (melissa@frannybeedesigns.com)
Makeup: Christina Burns of Flirt Make-up Artists /Hair: Kelly McCray (klmccray@gmail.com)
Day-Of Coordinator: Jeffry Chen, Bride’s Friend /Design + Planning: Bride
Wedding Dress: Rosa Clara /Shoes: Badgley Mischka /Hair Pin: BHLDN / Groom’s Tuxedo: A Re-Cut Tuxedo of his Father’s / Flower Girl Dress: Custom-Made by a Friend / Bridesmaids’ Dresses: J.Crew

See the video of this beautiful wedding!


See more photos and read more about Olivia & Mike's story on Style me Pretty 

Monday, January 23, 2012

Hair Tutorials

This weekend I will post the first of my hair tutorial sessions. Stay tuned for more... Be sure to sign up as a member or follow me via email to get your updates.

Tuesday, January 17, 2012

It's Giveaway Time!


Each month I will be giving away one of my favorite beauty products to one of my lucky readers. This month I will be giving away Clinique's Glow Blush Stick. It's a wonderful product to have in your beauty arsenal.

If you're looking to get that fresh look or you just want to make the switch from powder to cream then look no further!

Here's how to win:

Subscribe to my blog posts by clicking on the "Follow" button at the top left-hand of my home page or by entering your email address (I do not share your information) at the top right-hand side-bar above my profile.  I will do a random drawing at the end of the month and ship your prize to you.

Good luck, pretty ladies!

Monday, January 16, 2012

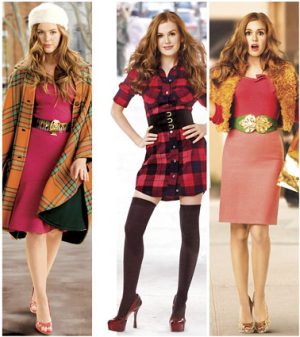
Just belt it! How to wear a belt.


Remember the days when a belt was used to keep your pants from falling down around your ankles? Well, we've evolved! Belts have become an accessory staple in fashion. What can a belt do for you? How can you change up an outfit with just the addition of a belt?

First, let's discuss the many types of belts available to us now days....


Cloth belts/Ribbon belts
Metal/Jewelry/Chain belts
Leather belts in Wide, Medium or Skinny
Rope belts
Stretchy belts


Here we go:

A wide belt can give a long torso a shorter appearance. Wear the belt below the bust at the most narrow part of your torso. Pair with a long blouse or a dress.


A skinny belt can help to elongate a short torso. Again, you would wear this just below the bust at the most narrow part of your torso. I like to get the adjustable ones so that there are multiple ways to wear the belt. This type of belt is great to pare with a pencil skirt.


A Metal/Jewelry/Chain belt worn loosely on the hips can also give the illusion of a longer torso for those of us who are short-wasted.


A rope belt (wrap around) will also help to elongate a short torso and give the illusion of curves where there are none.


My favorite look is to pair a pretty, flowy blouse with a classic cardigan and belt it with a thin leather belt. I must own about 20 of these belts in all sorts of colors. It pulls the outfit together nicely and accentuates the positive!

Have fun with it!


How do they do that? Glowing, dewy cheeks!


This is the first installment of "How Do They Do That?". Today I will reveal the secret to acheiving that glowing look that all of Hollywood is obsessed with.

You don't have to have the perfect complexion to pull this look off. You don't have to be pregnant or tan or drink a ton of water to get that glow.

Here's what you do:

(Word of caution: too much shimmer can make you look greasy.)

Tools needed: Small contour blush brush
                      Angled blush brush
                      Kabuki brush
                      Medium stippling brush
                      Powder bronzer of your choice
                      Light pink or peach powder blush
                      Cream blush in same or similar shade
                      Highlighting powder or white, shimmery eye shadow
           

 The process:  Start with your bronzer and the contour brush. Purse your lips together like you're puckering up for a kiss. Notice the area just below your cheekbones. This is the are you want to contour starting at the temple and working your way downward.


Next, take your angled brush and apply your pink or peach powder blush to the apples of your cheeks. Try smiling to define the area. Start from the apple and work your way back to the temples. I follow up with a Kabuki brush to blend the bronzer and blush slightly so there are no obvious lines.


Then, use your finger tips to apply your cream blush just over the area you used your powder blush on. Make sure that you stipple it on lightly and avoid rubbing it in.


Finally, take your stippling brush and apply the highlighting powder or eyeshadow just above the apples of your cheeks. You don't want to do too much or have it cover too wide of an area. Apply just enough to highlight the cheekbones.


Tada! No you have a dewy complextion and it was easy!


Products used for this demonstration:  Lancome Star bronzer natural matte
                                                         (don't use a shimmery bronzer to contour)
                                                          Clinique Aglow powder blush
                                                          Clinique glow blush cream stick
                                                          Mac Mineralize Skinfinish highlighting powder

Have fun with it!

Friday, January 13, 2012

Chunky Bracelets

I love bracelets! They are simple to make, inexpensive to buy and a lot of fun to play around with. The trends with bracelets are always changing. One year dainty is in and the next chunky is in.

I've gathered just a few of my favorite bracelets together to show you how to combine those dainty pieces and give them a new chunky life.


The first look is something I wear most days. I tend to wear my charm bracelets on my left hand with my watch so they don't get in the way when I'm using my right hand. These are my 3 favorite sterling silver bracelets. They look pretty simple and dainty by themselves. I think they look pretty cute together! People always ask me where I got my "bracelet" and I explain to them that they are all separate pieces.


While I was visiting my older sister for her 40th birthday in Atlanta, GA she gave me this chunky purple watch. My whole family knows how crazy I am about purple! Ordinarily I don't wear big watches, but I thought this one was pretty cute. 

I needed a bracelet for the other arm to balance out the look. I didn't want to buy anything so I pulled together a combo that I think worked.

The underside of the watch

The final combo


Next up is something I like to pair up with my L.B.D. (Little Black Dress). Both of these combinations have just enough bling and sparkle to dress things up. 
This one is a little more elegant and simple.
This one has a little more funk to it!

Up last, but certainly not least, is a little red number I like to wear when I want to add a little pop of color to my outfit. I have had this red beaded bracelet for several years and just recently brought it back to life with the addition of a silver bracelet in the center and two red, fire-polished, beaded bracelets flanking it on either side.


The combinations you can make with just these bracelets pictured are far too many to list individually. You truly can do so much! Have fun with it!